Scenic Draft 0.11: Warps, Noise Environments and Orthographic Cameras
scenic-draft is a TypeScript library for rendering 3D scenes in the browser. You describe the shapes and lighting, and it generates a shader to draw them.
The previous post covered glass, lighting and materials in 0.9.0. Version 0.11.0 adds ways to deform shapes, more backgrounds and an orthographic camera.
There was no 0.10.0 release on npm; these changes arrived together.
The additions are:
twistandbendto deform shapes.noisebackgrounds, which use fractal noise and a list of colours.- A
midcolour for gradients, and support for asunon any background. - Twelve
backgroundspresets. - An orthographic camera, with parallel rays and a
heightsetting to control framing.
The images below were rendered with the library in a headless browser and saved as files.
Twist
Earlier transforms let us position, resize, mirror and repeat a shape. Now we can deform it too.
twist(node, rate) rotates each horizontal cross-section around the y axis by rate * y radians. The rotation changes with height, turning a square column into a spiral.
Here is the same box([0.3, 1.3, 0.3], 0.05) with rates of 0, Math.PI / 2, Math.PI and 2 * Math.PI. Over its 2.6-unit height, that gives about 0, ⅔, 1⅓ and 2⅔ turns:
const column = box([0.3, 1.3, 0.3], 0.05)

union(
  paint(translate(column, [-3.3, 0.3, 0]), materials.terracotta),
  paint(
    translate(twist(column, Math.PI / 2), [-1.1, 0.3, 0]),
    materials.terracotta,
  ),
  paint(translate(twist(column, Math.PI), [1.1, 0.3, 0]), materials.terracotta),
  paint(
    translate(twist(column, 2 * Math.PI), [3.3, 0.3, 0]),
    materials.terracotta,
  ),
)
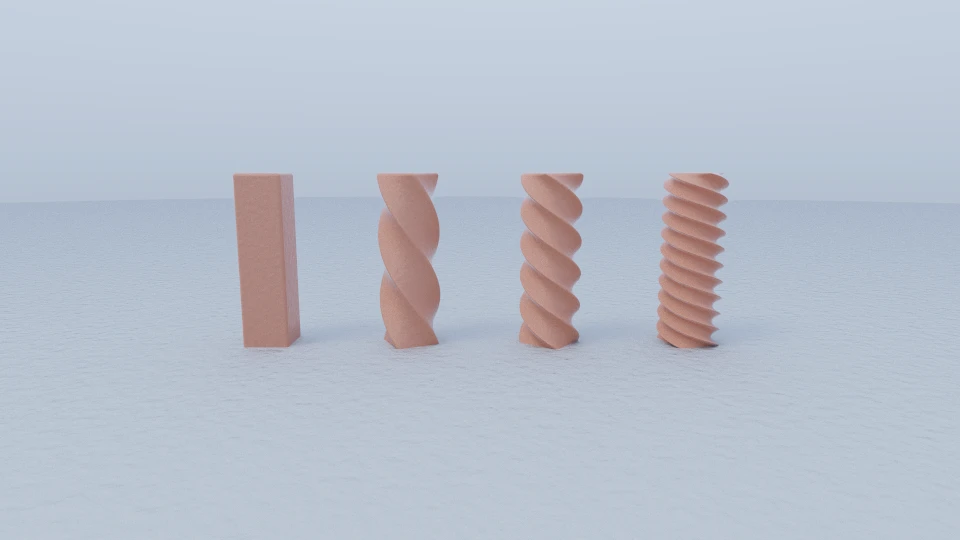
A rate of 0 leaves the shape unchanged, so you can animate a twist from zero. Positive rates turn in the same direction as rotateY.
Bend
bend(node, curvature) turns the point at x around the z axis by curvature * x radians. A straight bar becomes an arc with radius 1 / curvature. Negative values bend it into an arch; positive values into a bowl.
Here is a 3-unit bar with curvature 0 at the back, -0.35 in the middle and -0.65 at the front:
const bar = box([1.5, 0.14, 0.42], 0.06)

union(
  paint(translate(bar, [0, 1.5, 1.7]), materials.chalk),
  paint(translate(bend(bar, -0.35), [0, 0.6, 0]), materials.terracotta),
  paint(translate(bend(bar, -0.65), [0, -0.3, -1.7]), materials.copper),
)
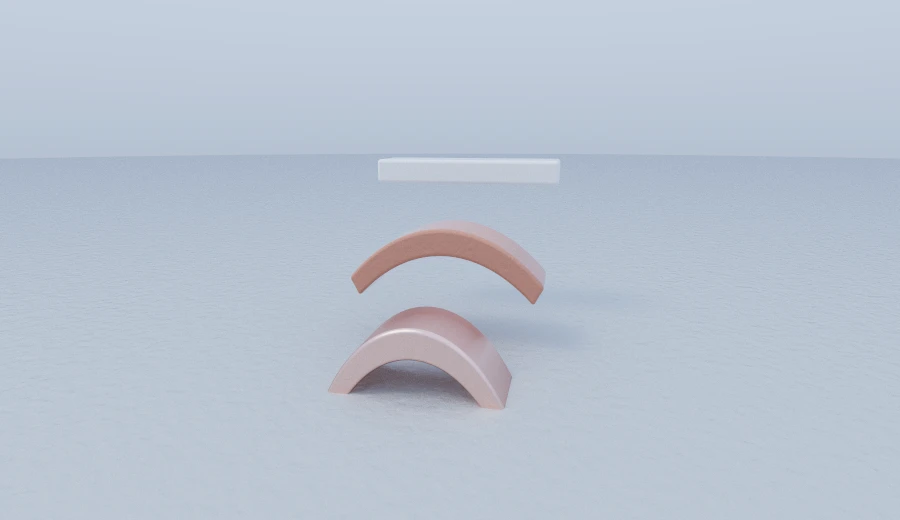
The bend depends on x, so first align the bar along that axis. For a bar running along y, use rotateZ before bending it.
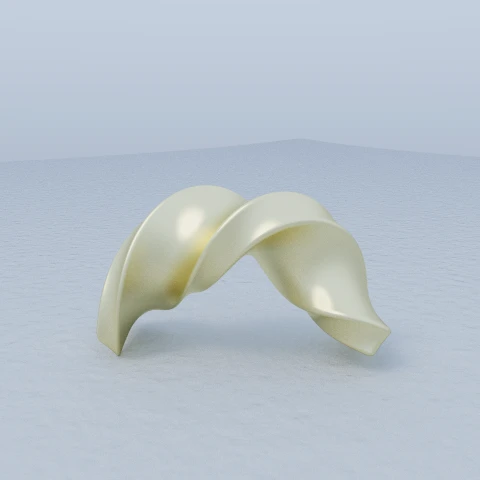
We can combine the two operations. Here we twist a bar while it lies along y, rotate it onto x, then bend it:
bend(
  rotateZ(twist(box([0.17, 1.5, 0.42], 0.06), Math.PI / 1.4), Math.PI / 2),
  -0.55,
)
What a warp costs
Simple transforms add very little shader work: translate is a subtraction and mirrorX an abs. Warps can have a larger effect on render time.
Sphere tracing uses the distance to the nearest surface as its step size. A warp stretches space, so the original distance can become an overestimate. Taking that full step could miss the surface.
To keep the step safe, the compiler divides the distance by 1 + |rate| * radius. The radius is measured in the plane of rotation. Here is the compiled twisted column:
float map(vec3 p) {
  float a0 = 3.141592653589793 * p.y;
  vec2 c1 = vec2(cos(a0), sin(a0));
  vec3 q2 = vec3(c1.x * p.x - c1.y * p.z, p.y, c1.x * p.z + c1.y * p.x);
  vec3 q3 = abs(q2) - vec3(0.3, 1.3, 0.3);
  float d4 = min(max(q3.x, max(q3.y, q3.z)), 0.0) + length(max(q3, vec3(0.0))) - 0.05;
  float d5 = d4 / (1.0 + 3.141592653589793 * length(p.xz));
  return d5;
}
This gives a conservative step size, so the ray takes more steps. It can also approach a surface very slowly. Warped scenes therefore include an extra step limit:
// A warped field is stepped in fractions of the true distance, so the walk
// needs an end: a ray still short of a surface by then is taken as escaped.
const int MAX_STEPS = 512;
There are three useful ways to control the cost.
Keep the shape near the warp axis. The divisor grows with length(p.xz), so moving it further from the axis makes each step smaller.
Keep rates modest. The warped examples here take roughly ten times as long per frame as the unwarped ones. Even the twisted and bent ribbon is only one box.
Apply the warp before positioning the finished shape, unless you want it to curve around the world axis:
translate(twist(column, Math.PI), [2, 0, 0]) // twists the column about its own axis
twist(translate(column, [2, 0, 0]), Math.PI) // sweeps it around the world axis
The first version twists the column around its own axis, then moves it. The second moves the column two units out before twisting, so it spirals around the world's y axis. That larger radius also makes tracing slower.
More background options
There are also two additions to the existing backgrounds.
solid now accepts a sun, so we can combine a uniform background with a directional light. Previously, this needed a gradient, even when both colours were the same:
solid([0.45, 0.48, 0.52], { sun: sun([-0.4, 0.85, -0.35], [5, 5, 5.2], 96) })
gradient now accepts a mid colour between bottom and top. This is useful for a band of haze or orange light near a sunset's horizon:
gradient([0.06, 0.04, 0.06], [0.12, 0.2, 0.45], {
  mid: [0.9, 0.4, 0.15],
  horizon: 0.02,
  width: 0.3,
  sun: sun([-0.75, 0.12, -0.3], [14, 6, 2.4], 260),
})
Noise environments
noise(colors, options?) uses fractal value noise to select a colour along each ray direction. The colours are evenly spaced in the range, so [a, b, c] puts b at the midpoint.
noise(
  [
    [0.06, 0.14, 0.42],
    [0.3, 0.42, 0.7],
    [1, 1, 1],
  ],
  {
    scale: 2.5,
    octaves: 5,
    sun: sun([-0.5, 0.65, -0.3], [8, 7.5, 6.8], 110),
  },
)
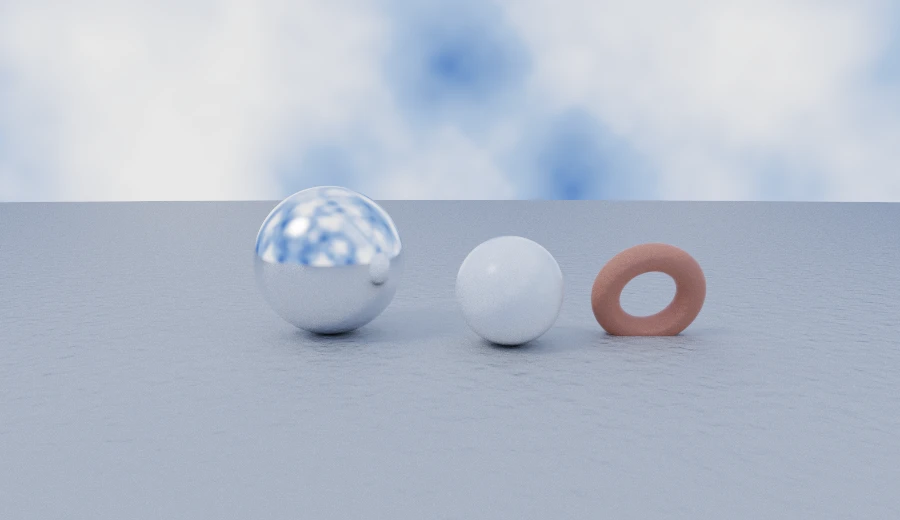
Look at the chrome sphere. The noise background appears in its reflections as well as behind it, because the environment also lights the scene.
scale controls feature size and defaults to 3. octaves adds layers of detail: the default is 4 and the maximum is 8.
Each layer is lacunarity times finer and gain times weaker than the previous one. Their defaults are 2 and 0.5. The compiler writes the frequencies directly into the shader:
float n = (envNoise(rayDir * 2.5)
  + 0.5 * envNoise(rayDir * 5.0)
  + 0.25 * envNoise(rayDir * 10.0)
  + 0.125 * envNoise(rayDir * 20.0)
  + 0.0625 * envNoise(rayDir * 40.0)) / 1.9375;
float t = clamp(0.5 + (n - 0.5) * 2.186, 0.0, 1.0);
Noise values cluster around 0.5, especially when several layers are averaged. Without adjustment, most of the background would use colours near the middle of the range.
The compiler estimates the spread and maps two standard deviations either side of 0.5 onto the full colour range. contrast, which defaults to 1, adjusts that mapping.
Above 1, you get larger patches of the end colours. Below 1, more of the image stays near the middle colour.
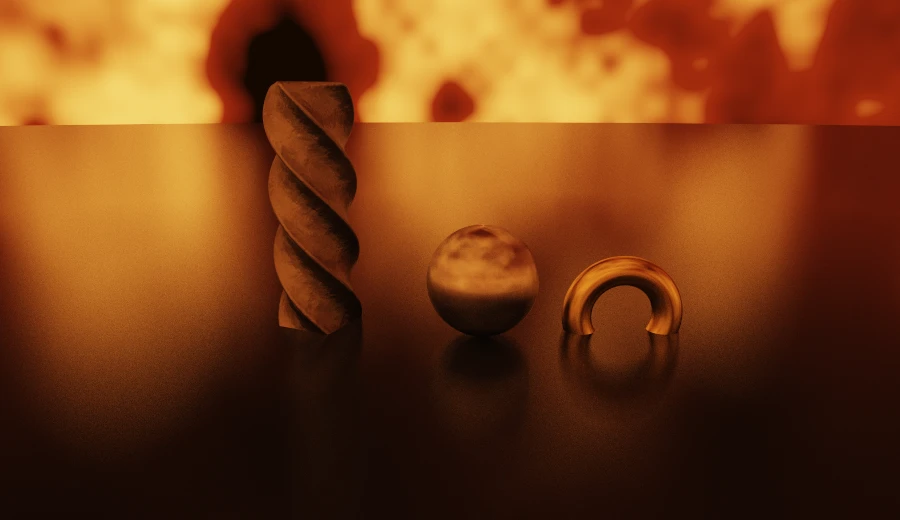
Background colours represent light, so components can exceed 1. backgrounds.ember uses this to make its orange patches bright enough to illuminate the scene:
Background presets
As with the material presets, it is useful to have a starting point you can choose by name. Version 0.11.0 includes twelve backgrounds:
| Preset | Built from | Environment |
|---|---|---|
white | solid | Flat white from every direction. No shadows at all. |
paper | solid | An off-white sheet, slightly warm. |
studio | solid | Dim cool fill plus a single softbox. |
daylight | gradient | Mid-morning: blue sky, warm ground bounce, soft sun. |
noon | gradient | Overhead summer sun: a small hot disc, hard shadows. |
overcast | gradient | White sky, no sun. Shadowless and even. |
sunset | gradient | Low warm sun under deep blue, through orange haze. |
dusk | gradient | A violet afterglow over nearly dark ground. |
night | gradient | Moonlight: almost no ambient, one small cold disc. |
clouds | noise | Broken cloud, white against blue. |
nebula | noise | Deep space with a bright core. |
ember | noise | Inside a furnace: dark red opening into hot orange. |
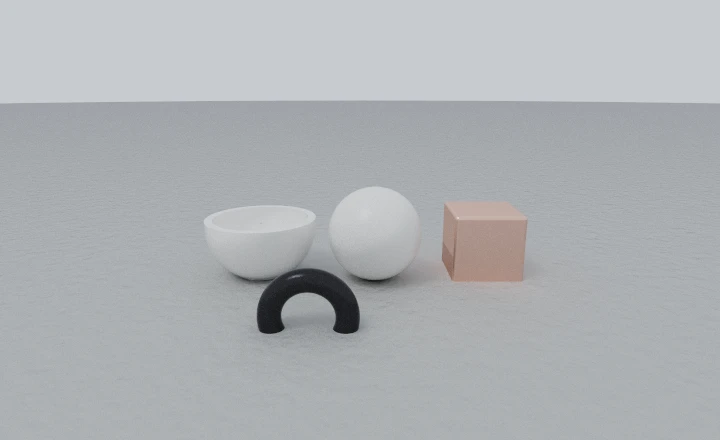
Let's render the same porcelain bowl, marble sphere, copper block and obsidian ring with three backgrounds. First, studio, a solid background with a sun:
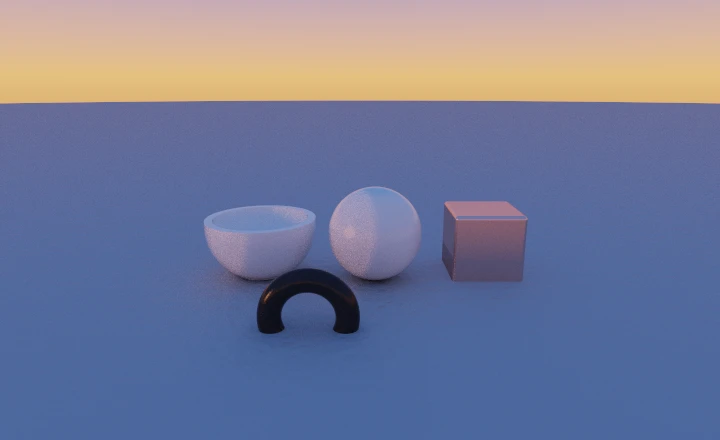
Then sunset, with an orange band from the mid colour:
And overcast, a white sky without a sun:
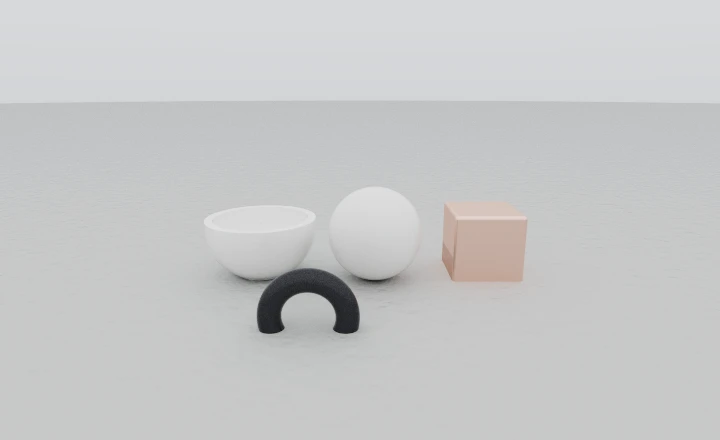
Changing the background changes brightness as well as colour. noon is much brighter than dusk, while night is dark and needs more samples to reduce noise.
The presets are ordinary data made with the public background builders. You can copy one and change the fields you need:
{ ...backgrounds.daylight, sun: undefined } // the same sky, no key light
Reading the preset definitions is also a useful way to learn what each setting does.
An orthographic camera
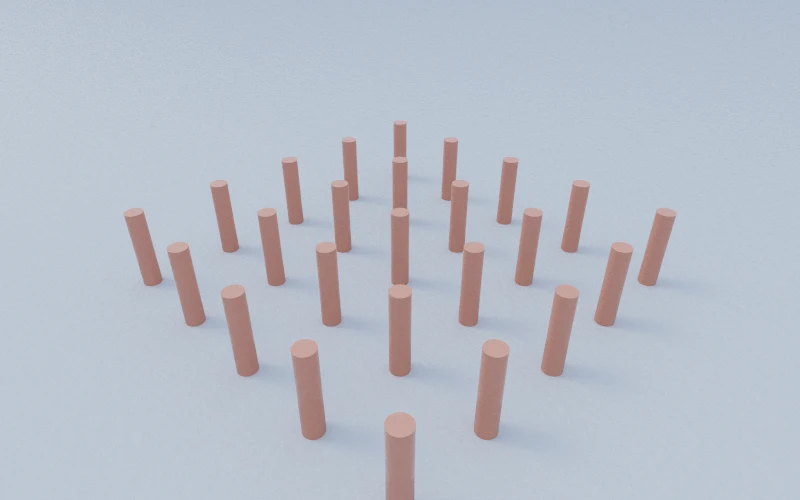
A perspective camera makes distant objects appear smaller. An orthographic camera sends parallel rays, so equal objects keep the same size at different distances. Parallel edges also stay parallel in the image.
Here is a cylinder repeated into a 5 × 5 grid. First, with perspective:
camera: { position: [7, 6, -7], target: [0, -0.2, 0], focalLength: 40 }
And orthographic:
camera: {
  position: [7, 6, -7],
  target: [0, -0.2, 0],
  projection: 'orthographic',
  height: 8,
}
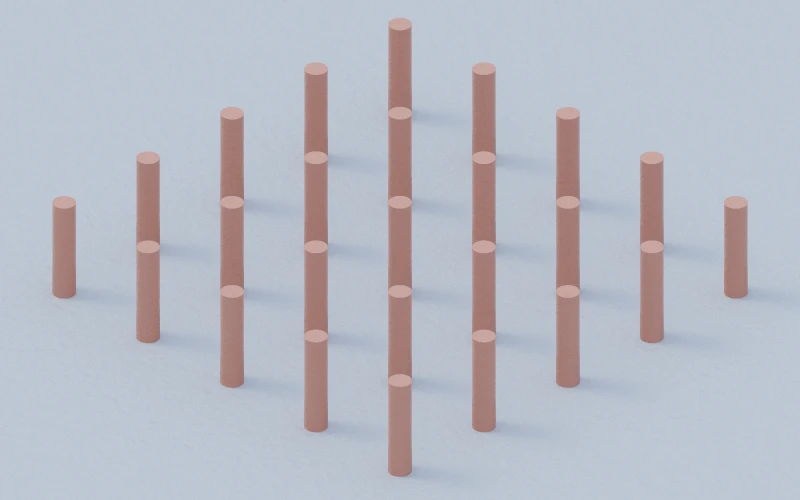
The shader change is small. Perspective rays share an origin and have different directions. Orthographic rays share a direction and have different origins:
// perspective
vec3 pos = camPos;
vec3 rayDir = normalize(camBasis * normalize(vec3(ndc, camZoom)));

// orthographic
vec3 pos = camPos + camBasis * vec3(ndc * camHalfHeight, 0.0);
vec3 rayDir = camBasis[2];
For an orthographic camera, height controls framing. It is the number of world units visible across the image's shorter side, and defaults to 4.
Moving the camera forwards or backwards doesn't change the apparent size of objects. Use height to frame the scene, and position and target to choose the viewing direction.
focalLength does not control orthographic framing, just as height does not control perspective framing.
You can still set fStop and focus to add depth of field. The plane at the focus distance stays sharp while objects in front of and behind it blur.
Putting it together
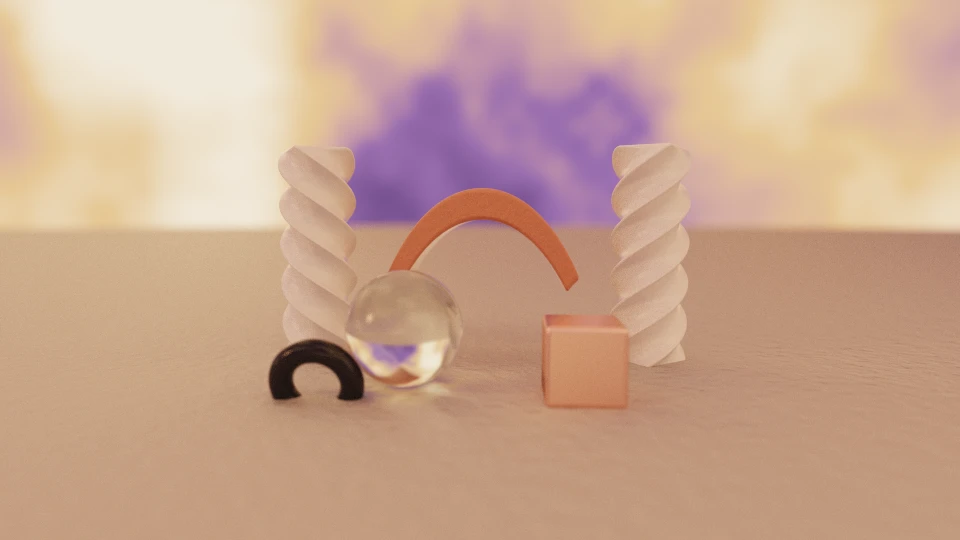
A noise sky, two twisted columns, a bent arch, glass, copper, obsidian, and a shallow depth of field:
{
  background: noise(
    [[0.05, 0.03, 0.08], [0.22, 0.12, 0.3], [0.95, 0.45, 0.2], [1.6, 1.1, 0.7]],
    {
      scale: 1.9,
      octaves: 5,
      contrast: 1.2,
      sun: sun([-0.65, 0.25, -0.3], [13, 7, 3], 200),
    },
  ),
  camera: {
    position: [0.4, 0.85, -6.9],
    target: [0, 0.15, 0.5],
    focalLength: 41,
    fStop: 2.2,
    worldUnit: 100,
  },
  scene: union(
    paint(plane([0, 1, 0], -1), materials.concrete),
    paint(translate(bend(bar, -0.62), [0, 0.95, 1.4]), materials.terracotta),
    paint(translate(twist(column, Math.PI), [-2.1, 0.3, 0.9]), materials.marble),
    paint(translate(twist(column, -Math.PI), [2.1, 0.3, 0.9]), materials.marble),
    paint(translate(sphere(0.62), [-0.75, -0.38, -0.5]), materials.glass),
    paint(translate(box([0.34, 0.34, 0.34], 0.05), [1.1, -0.62, -0.8]), materials.copper),
    paint(
      translate(rotateX(torus(0.36, 0.12), Math.PI / 2.4), [-1.55, -0.85, -1.0]),
      materials.obsidian,
    ),
  ),
}
Installing
pnpm add scenic-draft@0.11.0
The core library remains dependency-free, and scenes are still plain data.
The main trade-off here is render time. Twist and bend make new shapes possible but need more tracing steps. Noise adds a few calculations to the background. Presets are simply convenient starting points.
Documentation lives at scenic-draft.pages.dev.