Raymarching with Swift and Metal for Shadertoy-like Graphics
Shadertoy is a well-known website for creating and sharing shader-driven graphics. It works in the browser for a tight feedback loop between changes and results. You use WebGL to write shader code. Can we do something similar with native Swift code for iOS and macOS? Yes, at least in terms of creation.
Basics
It is remarkably easy to get a fully shader-rendered app. (Actually, it is more remarkable when you learn more and realise how tedious many of these technologies normally are to set up.) Let's create a new Multi-platform App Swift project in Xcode. Replace the main view in ContentView.swift with:
import SwiftUI

struct ContentView: View {
  let startDate = Date()

  var body: some View {
    GeometryReader { gp in
      TimelineView(.animation) { ctx in
        Rectangle()
          .ignoresSafeArea()
          .colorEffect(ShaderLibrary.raymarch(
            .float2(gp.size.width, gp.size.height),
            .float(startDate.timeIntervalSinceNow)
          ))
      }
    }
  }
}

#Preview {
  ContentView()
}
That is basically all the Swift code we will write. This won't work yet, as ShaderLibrary.raymarch doesn't exist. Let's create a new Metal file (e.g., RayMarch.metal) by pressing Cmd+M and replace its content with:
#include <metal_stdlib>
#include <SwiftUI/SwiftUI_Metal.h>
using namespace metal;

[[ stitchable ]] half4 raymarch(float2 position, half4 currentColor, float2 size, float time) {
  float c = (1 + sin(time)) / 2;
  return half4(c,c,c,1);
}
Now go back to your Swift file. Ideally, you should use Xcode's split view controls to get the Metal file alongside the Swift file. Start a preview by pressing Cmd+Option+Enter, and press Cmd+Option+P to restart it if necessary. If everything is working, it should show a full screen transitioning back and forth between white and black.
Live Coding (sort of)
Now you should be able to make changes to the low-level shader code and see the results in the preview pretty quickly. It isn't going to be quite as nice as Shadertoy, though Xcode will offer better code completion than Shadertoy.
Okay but how did that code work?
Let's look at the Swift stuff first. It combines a few things, but each is individually quite simple.
- We use
GeometryReaderto get the size of the view. - We use
TimelineView(.animation)to redraw the view every frame. Rectangleis a simple view that takes all available space offered. We useignoresSafeArea()to ensure it fills the whole screen..colorEffectis a SwiftUI modifier that allows us to apply a shader to a view.ShaderLibrary.raymarchgives us access to our shader function. We pass the data into it. One thing might seem a little odd: the.float2and so on. This is because Metal expects specific data types that differ from what we've been using.float2is simply a 2D float vector (and similarly for3and4).
On the shader side, we also need to declare the parameters consistently. Metal is not Swift; indeed, this can be pretty confusing, as some things will look quite similar. It is a low-level shader language. We will be writing fragment shaders, which are massively parallel programs that run for each pixel being drawn.
We declare a matching function and signature. For colorEffect, we actually get position and currentColor arguments out-of-the-box. We can then add further arguments.
[[ stitchable ]] half4 raymarch(float2 position, half4 currentColor, float2 size, float time) {
Now, to draw something, we first take the time and then calculate its sin (this will give us a value between -1 and 1). We must return a 4D colour (the half4). This comprises red, green, blue, and opacity values. For shaders, we work with values between 0 and 1. To start with, we just set all the colour components to the same value. This will give us a greyscale colour. And we set the opacity to 1 (fully opaque).
  float c = (1 + sin(time)) / 2;
  return half4(c,c,c,1);
Experiment with changing some of these c values to specific values between 0 and 1.
Make it more interesting
Add one new line at the start of our shader function. This gives us a uv value (like coordinates on an x,y graph) that goes between -1 and 1 vertically (and proportionally horizontally).
float2 uv = (position * 2.0 - size) / size.y;
We can now use this to add some gradients:
  float2 uv = (position * 2.0 - size) / size.y;
  float c = (1 + sin(time)) / 2;
  return half4(1 + half2(uv),c,1);
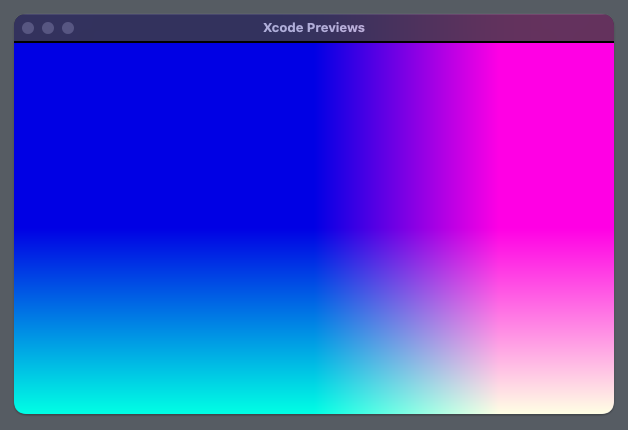
The uv values will include negative numbers and can even exceed 1. This is why the gradient is cut off. We can fix this like so:
return half4(half2(1 + uv)/2,c,1);
One of the nice things we can do with shaders is combine vectors and scalars without needing to convert between them. uv is a 2D vector, and 1 is a scalar. We can add them together and then divide by 2 to get a 2D vector again.
Raymarching
Raymarching is an awesome technique for creative rendering. It's a rendering technique where we cast rays from a camera and move along these rays in steps until we hit an object or reach a maximum distance. It is actually quite simple yet can produce complex and interesting visuals. The rest of this article will show how to do this with Metal and SwiftUI. I was inspired by kishimisu's video tutorials on shaders, and while the details here are different (this is Metal, not GLSL), the basic steps are similar.
Basic Raymarching
We essentially think of a camera being at a particular point. We shoot rays from that point through a 'screen'. For each ray, we calculate the distance to the nearest object. We then move along the ray by that distance and repeat until we are very close to the object or we have moved very far away. Let's break that into two parts.
We call ro our 'ray origin' (our location; we imagine ourselves 3 units back in space). Then we shoot a ray through our screen. But we have already created a uv value for each pixel. So we can use that. A good enough approximation for now is to use uv as the x and y values of our ray direction. For z, let's just use 1. We can then normalize the vector (meaning make its length 1).
  float3 ro = float3(0,0,-3);
  float3 rd = normalize(float3(uv, 1));
Okay so we have some rays. What about the distance? We need a (signed) distance function. To keep things simple, let's just use a circle at (0,0,0) of radius 1. What is the distance from any given point to this sphere? Well, it is actually trivial to get this in Metal. We can use length(p) - 1.
Okay, let's actually implement the ray marching. Set up a function to handle the distance calculation:
float distanceToBall(float3 p) {
  return length(p) - 1;
}
Add to our existing shader:
[[ stitchable ]] half4 raymarch(float2 position, half4 currentColor, float2 size, float time) {
  float2 uv = (position * 2.0 - size) / size.y;

  float3 ro = float3(0,0,-3);
  float3 rd = normalize(float3(uv, 1));
Let's do the raymarching. Start at t = 0 (remember, this happens for every pixel). Now, we iterate up to 80 times. We move forward in the direction of our ray by the distance to the ball.
We repeat this process until either:
- We get very close to the object (
d < 0.001), or - We've gone too far and give up (
t > 100).
  float t = 0;

  for(int i = 0; i < 80; i++) {
    float3 p = ro + rd * t;
    float d = distanceToBall(p);
    t += d;

    if(d < 0.001 || t > 100) break;
  }
Finally, we need to return a colour from the shader for the pixel. If t is high, let's use black, i.e., half4(0,0,0,1). If it's close, let's try half4(sin(t),0,0,1) (this is a subtle way of adding a slight gradient based on t; we'll see more interesting colouring methods later).
  if(t > 100) return half4(0,0,0,1);

  return half4(sin(t),0,0,1);
}
This gives us the following result, which at first glance might seem trivial. But we are doing something pretty amazing: with very basic mathematics and in about 50 lines of code, we are rendering a 3D object, pixel by pixel, on our GPU.
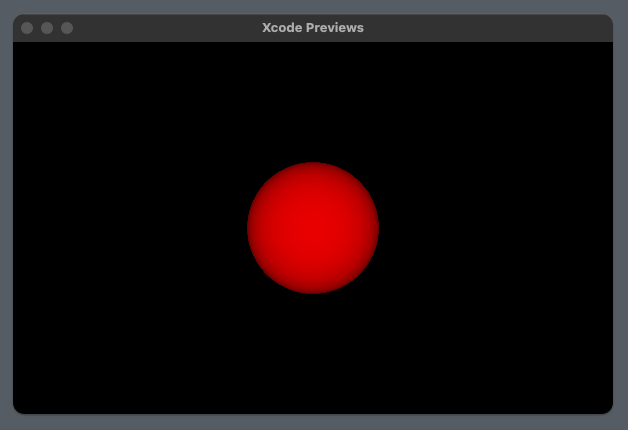
Let's animate it by changing the origin with time:
float3 ro = float3(0,0,-3.1 + cos(time));
and make the colours more interesting:
return half4(sin(t),cos(t),t,1);
Taking It Further
With not much more code, we can achieve something like this (video link):
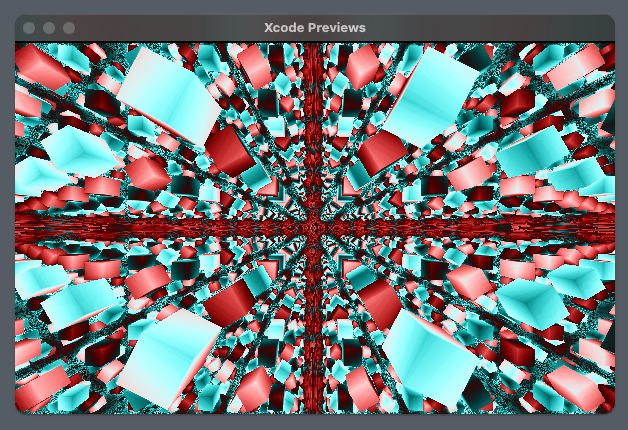
Video version (note that the actual rendering is much sharper than even the 4K version of the video):
Let's update our Swift code to use ShaderLibrary.raymarchB and create a new shader function in our existing Metal file:
[[ stitchable ]] half4 raymarchB(float2 position, half4 currentColor, float2 size, float time) {
  float2 uv = (position * 2.0 - size) / size.y;

  float3 ro = float3(sin(time),0,-3);
  float3 rd = normalize(float3(uv, 1));

  float t = 0;

  int j = 2;
  for(int i = 0; i < 80; i++) {
    float3 p = ro + rd * t;
    float d = map(p, time);
    t += d;

    j = i;
    if(d < 0.001 || t > 10) break;
  }

  if(t > 100) return half4(0,0,0,1);

  return half4(palette(t * 0.9 + time * 0.01 + float(j) * 0.01, half3(0.5), half3(0.5), half3(1.0), half3(0., 0.2, 0.2)), 1);
}
This is similar to before, except we have made our colouring fancier using Inigo Quilez's palette helper and reduced the t value at which we give up. We've also renamed the distance function to map and added a j variable to keep track of the iteration count (which we will also use for colouring).
For the distance calculation, we do a bit more. Instead of using p directly, we take the fractional part of it in all dimensions (this allows for an infinite repetition of our object). We also introduce a rotation to make the shape more dynamic (actually, we rotate our ray, but the effect is the same; many ray marching approaches apply transformations to the ray rather than the object itself).
float map(float3 p, float time) {
  float3 q = float3(fract(p.xy) - 0.5, mod(p.z, 0.5) - 0.25);

  q.xy = q.xy * rot2D(time * 0.5 + floor(p.z));

   float box = sdBox(q, float3(0.1));
   return box;
}
We then calculate a distance. We use a box, which is a little more complex than a sphere but not by much (and there is a known standard way to formulate it). You can learn more about this and many other 3D SDFs here.
float sdBox(float3 p, float3 b) {
    float3 q = abs(p) - b;
    return length(max(q, 0.0)) + min(max(q.x, max(q.y, q.z)), 0.0);
}
The above code depends on a couple of helper functions: the first rotates in two dimensions, and the second calculates the modulo of two floats.
matrix<float, 2> rot2D(float angle) {
    float s = sin(angle);
    float c = cos(angle);
    return matrix<float, 2>(c, -s, s, c);
}


float mod(float a, float b) {
  return a - b * floor(a/b);
}
But the complete shader for this infinitely repeating, animated, psychedelic ray marching effect is only about 50 lines of code. And you could easily tie details of the shader rendering to your app's state (it could show loading progress, visualize music, or represent any other dynamic data).
Source code
The entire, remarkably short code is available as a Gist.
Learn More
In terms of Swift resources:
- Paul Hudson has several tutorials on shaders in Swift(UI) (for example, simple shaders) and has a library of shaders you can apply to your apps.
There are vastly more resources on shaders using WebGL/GLSL than Metal, but often they are quite easy to translate:
- Inigo Quilez's articles are the definitive reference for ray marching, SDFs, and various other creative coding techniques.
- He also has some astonishing live coding videos creating incredible scenes with similar techniques, for example, this intricate, naturalistic landscape.
- Kishimisu has a fantastic pair of video tutorials on shaders.